Writing an LSIF Indexer
Uwe Hoffman
Want to use LSIF for precise code intelligence on Sourcegraph? See "LSIF: Fast and precise code intelligence (Sourcegraph documentation)".
This article explores what it would take to write an LSIF indexer. Along the way, we will learn a little bit about parsing, walking abstract syntax trees, scopes and the LSIF file format.
LSIF (Language Server Index Format) is a data format that captures code intelligence facilitating code navigation, hover documentation etc. The blog post Code intelligence with LSIF has more details about LSIF.
An LSIF indexer analyzes a collection of input source code files and produces an LSIF data file. This LSIF data file, in turn, is used by an editor or a Sourcegraph instance or some other developer tool to offer functionality like "Go to Definition", "Show References", hover results with documentation and type information, semantic search, etc.
To make things concrete for our exploration, we will write an LSIF indexer for the programming language Jsonnet, and we will limit ourselves to providing enough data for "Go to Definition" in a Jsonnet file including its imports. Jsonnet is a configuration and data templating language closely linked to JSON. It is simple enough that parsing will not become a distraction in this exploration, but it is complex enough to show that simple lexical text search will not be sufficient for accurate "Go to Definition" LSIF data. We will write our LSIF indexer in Go and use the parser generator Antlr to do the heavy lifting on the parsing side.
Note: All the code for this exploration is available at lsif-jsonnet.
So let's dive right in. First, we figure out what data a developer tool would need to offer "Go to Definition" functionality. The developer tool has a cursor at some location in a source file. If that location happens to be at an identifier (like a variable name or function name), and the user invokes "Go to Definition", the tool needs to move the cursor to the location in one of the source files where the identifier was defined.
Our units of data are locations in input source files. The cursor is at one location and will move to another location. There are also relationships between locations: one location is linked to another location because the reference is at one location and its definition at the other. We need to extract these two things from the input source files: locations of identifiers and the relationships between these locations.
Why do we need fullfledged parsing to extract this data? Consider the Jsonnet file in Listing 1.
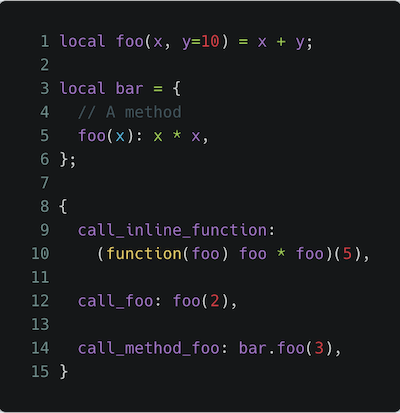 Listing 1.
There are many locations where the string "foo" appears. Even if we separate the input into proper tokens (which eliminates "call_foo" and "call_method_foo" as locations for identifier "foo"), we would still struggle to establish the correct relationships between all the locations where the identifier "foo" appears. On line 1 "foo" is the definition of a function, on line 5 "foo" is the definition of a method of "bar", on line 10 "foo" is a function parameter, on line 12 "foo" is a reference to the function from line 1 and finally on line 14 "foo" is a reference to the method on line 5. A pure lexical search cannot tell us that the reference on (line 14: column 27) is defined on (line 5: column 3).
Note: From here on in this article we will denote locations as (line:column) tuples, so reference "foo" at (14:27) is defined at (5:3).
Parsing
There are many ways to write parsers. For this exploration we choose the parser generator Antlr. It will generate the Go code that does the actual parsing for us using a specification of the grammar of the language we want to parse, namely Jsonnet. We could start from scratch and specify the grammar from the Jsonnet language spec, but luckily somebody else already did this work, and we can just reuse their grammar file (thank you!). Antlr takes this grammar file as input and generates a Go package that parses Jsonnet files and produces AST data structures (abstract syntax trees). We don't need to touch the parser package, it is generated by the Antlr tool.
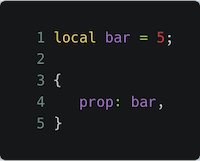
For example the following Jsonnet snippet:
local bar = 5;

{
   prop: bar,
}
will result in this AST:
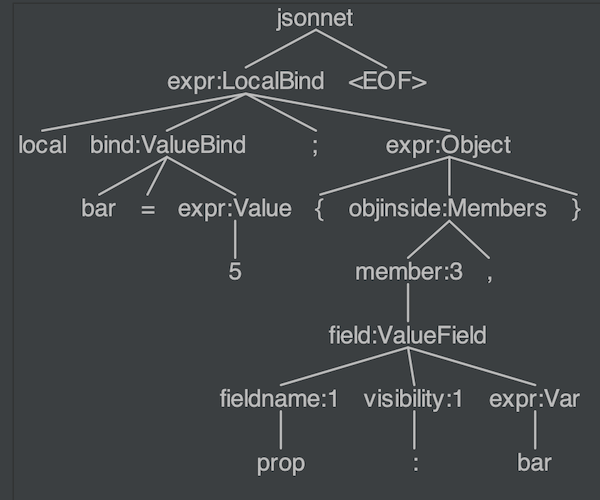
The leaf nodes correspond to tokens, and the non-leaf nodes correspond to rules in the grammar. The text in a non-leaf node in the diagram above shows which rule corresponds to the subtree rooted in that node. For example, the "expr:LocalBind" node corresponds to the LocalBind alternative in the expr rule (line 43 in the grammar file).
Antlr will generate a visitor that walks the AST (also in the parser package). This visitor, in turn, calls methods on a listener whenever the visitor enters a tree node and whenever the visitor leaves a tree node.
Note: This mechanism should sound familiar to anybody who has written XML SAX code. The OCW Note Reading 18 has a nice introduction to parser generators using Antlr.
We have to write the listener. This approach has the nice advantage that it separates the actual parsing code that Antlr generates from the code that we write to extract useful information from the parsed data.
Scopes
So what is the useful information from the parsed abstract syntax tree that we need? To figure this out, let's go back to Listing 1. Each occurrence of the identifier "foo" happens within a scope, a region of the whole program. The figure below shows the scopes of Listing 1. The scopes form a tree, the file scope is the parent scope and certain language constructs activate additional scopes, such as a function parameter scope or an inner object scope. For each reference of "foo" we can find its definition by looking in the tree path of active scopes. If no definition is found in a scope, we look in its parent and so on all the way to the file scope. We are interested in these bindings from reference to definition (the curvy lines in the figure connecting the "foo"'s).
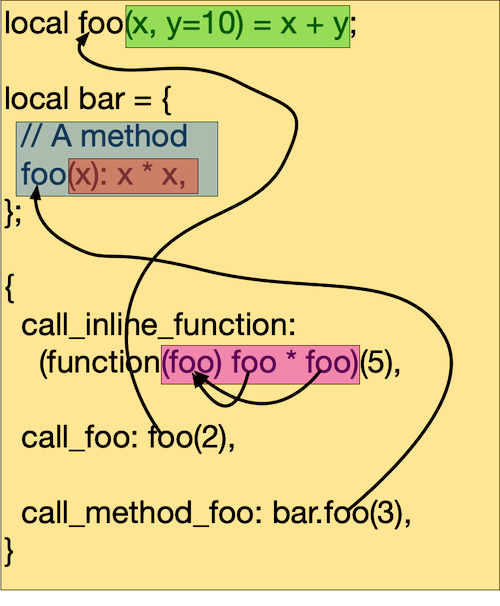
 Tree hierarchy of scopes for Listing 1.
We need to:
- maintain the scope hierarchy
- for each identifier occurrence
- if it is a definition, add it to the active scope
- if it is a reference, look in the scope hierarchy for its definition starting at the active scope and going up its parent link
A natural place for all this state is the listener.
type Listener struct {
	pathResolver *PathResolver
	*parser.BaseJsonnetListener
	file         string
	dcls         []*types.Declaration
	imports      []*Listener
	currentScope *types.Scope
	fileScope    *types.Scope
	errs         []error
}
We have one listener for each file. Each import expression will add an additional listener to the imports field (by recursively parsing the imported file). We store the file scope, the current scope and a list of declarations. Each declaration will keep track of all its uses. Let's look at some of the listener interface method implementations.
When the AST walker enters a function node, our listener EnterFunction method is called. We create a new scope for the function parameters and activate it.
func (ll *Listener) EnterFunction(ctx *parser.FunctionContext) {
	startPos, endPos := types.NewPos(ctx.GetStart()),
	      types.NewPos(ctx.GetStop())

	scope := types.NewScope(ll.currentScope, startPos, endPos)
	ll.currentScope = scope
}
When the function param node is visited, this method is called and we add each function param as a declaration to the current scope (which in this case will be the function scope):
func (ll *Listener) EnterParams(ctx *parser.ParamsContext) {
	for _, dcl := range ctx.GetPos() {
		ll.addDeclaration(dcl, types.ParamDeclaration)
	}
	for _, dcl := range ctx.GetNames() {
		ll.addDeclaration(dcl, types.ParamDeclaration)
	}
}
Visiting a variable reference node results in the call to this listener method:
func (ll *Listener) EnterVar(ctx *parser.VarContext) {
	id := ctx.ID()
	pos := types.NewPos(id.GetSymbol())
	_, decl := ll.currentScope.LookupParent(id.GetText(), pos)

	if decl != nil {
		decl.Uses = append(decl.Uses, types.Use{pos, ll.file})
	}
}
We find the appropriate declaration for this var by walking up the scope chain and add this location to its uses.
And finally, when a function node is exited, this listener method is called:
func (ll *Listener) ExitFunction(ctx *parser.FunctionContext) {
	ll.currentScope = ll.currentScope.Parent()
}
It deactivates the function scope and makes its parent the current scope.
There are more listener methods for other AST node types where scopes get activated/deactivated, identifiers are used, functions are called, fields are referenced etc. They are similar to the examples shown. After the AST of a Jsonnet file has been visited, we have all the declarations and for each declaration, its uses. We are ready to export to a LSIF data file.
Note: Because of our choice of Jsonnet as the language we are analyzing, our parsing and data extraction is not 100% accurate. Jsonnet is a dynamic, interpreted language and we are doing static analysis. For example (expr).field with expr being a complicated expression that resolves at runtime in the interpreter makes it impossible to bind field to the right definition without running a Jsonnet interpreter.
LSIF data format
Before we export to LSIF, we should look and understand the LSIF data format. We have seen in the introduction that the units of data are locations in files and the relationships between them. As a whole, these elements form a graph. LSIF captures this graph by listing the nodes and edges in this graph as a sequence of JSON objects. The best way to illustrate this is by working through an example. Consider again the Jsonnet snippet:
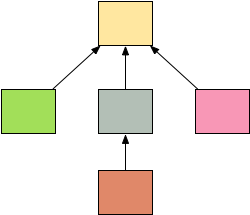
The two locations of interest are (1, 7) where "bar" is defined and (4, 10) where "bar" is used. For the definition, we need to generate the following subgraph:
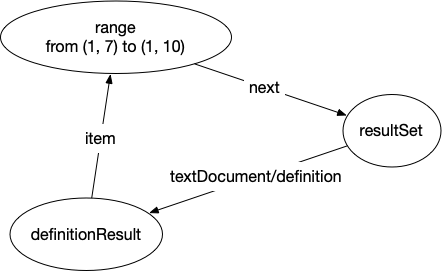
The three nodes are:
- a range node where the definition is (in LSIF we need ranges with start and end location, not just locations)
- a resultSet node
- a definitionResult node
The resultSet node will be connected to the definition and all the use nodes bound to that definition. This allows LSIF to attach information that is shared by all these nodes to the resultSet node instead of repeating it for each node. Since all use nodes and the definition node are connected to the resultSet node we need a way to call out which node is the actual definition. This is done with the definitionResult node which points back to the range node.
For the reference, we add one more node to this subgraph making it as follows:
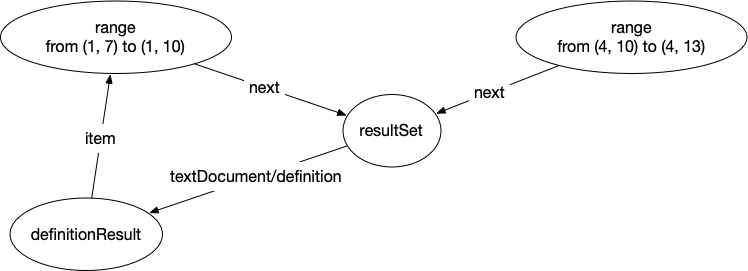
That is basically it. These subgraphs get created for each definition, and reference, and then connected together by document nodes that, in turn, are connected to a project node.
Since the snippet above is a valid Jsonnet program, we can generate the real LSIF graph:
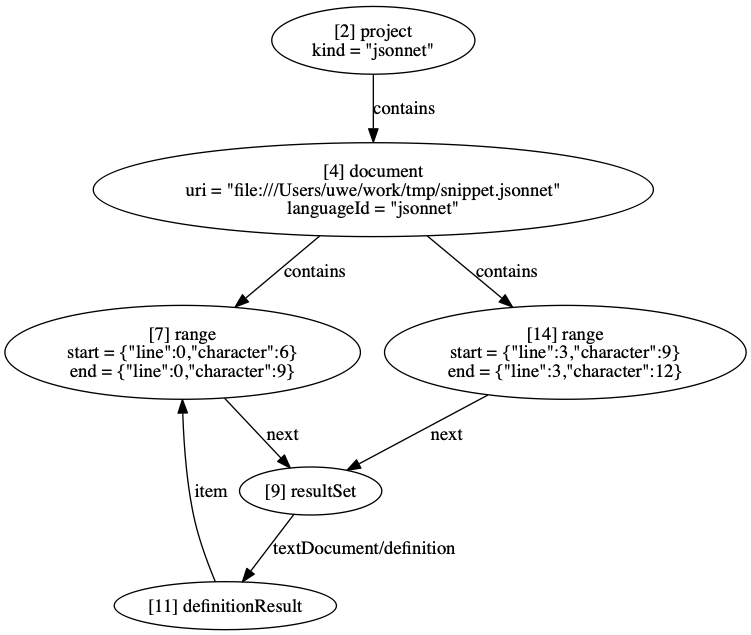
Note: Locations are zero-based in the real LSIF graph. Also, each node has a unique ID, which allows us to specify the edges connecting them.
The LSIF data file looks like this:
{"id":1,"type":"vertex","label":"metaData","version":"0.4.0","projectRoot":"file:///Users/uwe/work/tmp","positionEncoding":"utf-16","toolInfo":{"name":"lsif-jsonnet","version":"1.0.0","args":["-o","snippet.lsif","snippet.jsonnet"]}}
{"id":2,"type":"vertex","label":"project","kind":"jsonnet"}
{"id":3,"type":"vertex","label":"$event","kind":"begin","scope":"project","data":2}
{"id":4,"type":"vertex","label":"document","uri":"file:///Users/uwe/work/tmp/snippet.jsonnet","languageId":"jsonnet"}
{"id":5,"type":"vertex","label":"$event","kind":"begin","scope":"document","data":4}
{"id":6,"type":"edge","label":"contains","outV":2,"inVs":[4]}
{"id":7,"type":"vertex","label":"range","start":{"line":0,"character":6},"end":{"line":0,"character":9}}
{"id":8,"type":"edge","label":"contains","outV":4,"inVs":[7]}
{"id":9,"type":"vertex","label":"resultSet"}
{"id":10,"type":"edge","label":"next","outV":7,"inV":9}
{"id":11,"type":"vertex","label":"definitionResult"}
{"id":12,"type":"edge","label":"textDocument/definition","outV":9,"inV":11}
{"id":13,"type":"edge","label":"item","outV":11,"inVs":[7],"document":4}
{"id":14,"type":"vertex","label":"range","start":{"line":3,"character":9},"end":{"line":3,"character":12}}
{"id":15,"type":"edge","label":"next","outV":14,"inV":9}
{"id":16,"type":"edge","label":"contains","outV":4,"inVs":[14]}
{"id":17,"type":"vertex","label":"$event","kind":"end","scope":"document","data":4}
{"id":18,"type":"vertex","label":"$event","kind":"end","scope":"project","data":2}
The only additional vertices not described yet are the ones labelled "$event". They serve as delimiting markers for start and finish of projects, and start and finish of documents (files).
Generating
We are finally ready to generate the LSIF data. The code is in dumper.go. We proceed in a top-down fashion. We start with the project and the listener for the main Jsonnet file. We emit the project node and delimiter marker for start of project and then call the method for emitting a document. This, in turn, emits a document node and start of document marker. It then emits declarations which create those subgraphs from above by also iterating through their reference lists. We also recursively call document emit methods for each import passing in the corresponding import listener created from parsing the import file. We finish by returning from these methods, creating stop markers as we unwind.
The actual emitting is done by protocol.go, which has utility methods to create the appropriate vertices, edges and JSON lines.
Testing and validating LSIF output
lsif-util is a commandline tool for validating the generated LSIF data syntactically. It also supports producing dot graphs that can be turned into PNG images with dot.
- Validate:
lsif-util validate data.lsif - Visualize:
lsif-util visualize data.lsif --distance 2 | dot -Tpng -o image.png
Of course, since we're Sourcegraph, we would be happy if you try out LSIF with a Sourcegraph instance by following these instructions.
Check out LSIF.dev for a curated list of LSIF indexers. If you are interested in adding your LSIF indexer to the list, create a pull request here.
If you enjoyed the material in this article and like working on developer tools, we're hiring!